
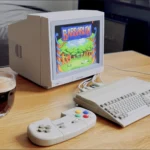
Wish your A500 Mini had a working disk drive and more USB ports? You’re not alone. Over on the English Amiga Board forums, one guy has started modding his A500 Mini to do just that, spending comparatively little to get great results.
Providing photos and quite detailed steps, modder tover99 outlines how he added the SD card reader, USB ports, and an old USB 2.0 cable. Describing it as “quick and dirty, fully functional,” the result is a system with additional USB ports and an SD card slot. tover99 has enhanced the look of his SD cards and adapters with “disk labels.”
[ngg src=”galleries” ids=”15″ exclusions=”54,55,56″ display=”basic_thumbnail” thumbnail_crop=”0″](Images by tover999)
Here’s how he did it:
- First I took an old USB2 SD card reader, that I still had lying around, removed the plug and soldered a cable with a plug to it. I had to cut 3 USB-cables until i found one, that actually had data lines .
- Then I used my “chinese dremel shaped object” to create an highly precise opening, for the SD-Cards and notched out some of the cases stiffening elements to make room for the reader.
- I put the reader back into its plastic case and mounted it in place with some epoxy putty.
- Since USBs are rare little creatures on TheA500 Mini, I found this nice small package of a 4xUsb-Hub, that even has an seperate 5V-In, which I didn’t connect for now.
- I had hoped it would even be small enough to go out the back of the case, but that was a long shot, and depite the really compact form factor, there were a few milimeters missing. Anyways … I cut the data lines of USB2 on the A500 mainboard and bent the pins up.
- Then I used the rest of the cable I used for the SD card reader and soldered the hub directly to the USB2 on the mainboard. Luckily the little cable/plug I removed from the Hub was just the right lenght to reconnect the disconnected data-lines to one output of the Hub, so that the original USB2 on the back of the case is still usable.
- Then it was time again to butcher the nice A500 case for the 2 new USB-ports on the side. I put the hub back in it’s original case, which i slightly chopped, so that the new ports can pertrude the side of the A500. I then again used epoxy putty to mount it in place.
- To close the A500-Case I had to remove/relocate one of the metal weights and cut one of its mounting studs in the lower part of the case. I simply used double sided tape to fix the weight nearby, where ist was not in the way of things.
The result, as you can see, is pretty desirable. Who wouldn’t have wanted SD card support built into the A500 Mini? Justy imagine the amount of time you could save swapping USB sticks with every WHDLoad file inserted into the little replica computer!
I don’t know about you, but I’m sorely tempted to try this hack myself…
Affiliate Disclosure: Some of the links in this post may be affiliate links, which means I may earn a small commission if you make a purchase through those links. This comes at no extra cost to you. Thank you for your support!

Christian Cawley is the founder and editor of GamingRetro.co.uk, a website dedicated to classic and retro gaming. With over 20 years of experience writing for technology and gaming publications, he brings considerable expertise and a lifelong passion for interactive entertainment, particularly games from the 8-bit and 16-bit eras.
Christian has written for leading outlets including TechRadar, Computer Weekly, Linux Format, and MakeUseOf, where he also served as Deputy Editor.
When he’s not exploring vintage consoles or retro PCs, Christian enjoys building with LEGO, playing cigar box guitar, and experimenting in the kitchen.